第二碁盤 - 2nd Goban (Go Board) Build - Part One
I like making things and I also enjoy taking skills or experience to improve the quality of made things so have decided to make a second Go board. This time targeted at Japanese size stones. My previous attempt was adequate but suffered from some smoothness issues on the board itself and a lot more around the sides.
So I have moved to the planning stages. It will broadly follow the same sizing structure as before with the one exception of the star points being increased from 4mm to 5mm. I found the (correctly sized) 4 looks wrong and this might be the dowels used shrinking to fit the hole or the glue/other impacting appearance but am going for a larger size this time around.
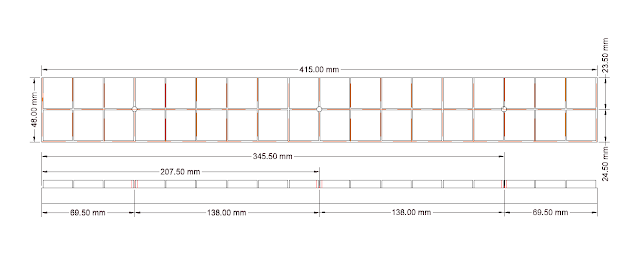
First steps involve planning out the sizing structure in CAD

Next up I have started considering wood choice. I rather likes the maple used for the majority of the board last time which worked well and seems to cope nicely with the stones with a nice colour. The walnut (used for the slots) was perfectly fine but this time round I thought I would try a darker wood. The darkest is around the Ebony variety but that is not only hard to get hold of it is also illegal as it is an at risk timber so out of more source able dark woods we have black walnut or Bubinka - which is an African wood. I already have a dried Bubinga plank that had been used in box making previously so I am considering trying that but had to run some tests first as the wood is noticeably splintery with gaps and I was slightly concerned sanding it down could lead to breakages thus damaging the board impression.
I therefore ran three tests. One to see how it looked when thicknessed correctly (to see what gaps might remain) and also to attach a strip to the end of a random piece of wood and in the middle of two pieces of wood so I could see if splintering occurred.
I therefore ran three tests. One to see how it looked when thicknessed correctly (to see what gaps might remain) and also to attach a strip to the end of a random piece of wood and in the middle of two pieces of wood so I could see if splintering occurred.
Here are the results, though it will be hard to see (I think)
A strip was cut at about 1.3mm and then attached as noted


With no losses of wood or chunks disappearing I then thicknessed the strip to exact size. In the first photo at the top you can see the woods appearance post table sawing (so when the strop was first cut), note the small gaps and the texture. Immediately below you can see the thicknesses result. Minimal grain (though not no grain) and tiny gaps still remain (but tinier than before)


The bottom shot shows the strip just placed between two blocks to give an idea of the actual thickness and colour (the upper block has the 1.3mm strip still attached so you can see how that little extra thickness can impact size ratios.
I am pleased with that so will now start generating blanks for the strips while I save up cash for the required maple. I am going for a double requirement for the main wood blocks (so I can pick the best pieces and have a reserve, last time I went for about a third more I think which turned out to be pushing the limits. But, whereas the blocks need to be accurately flat on all 4 sides with correct right angles the strips only have 2 key dimension (top and bottom) and the thicknesser will cope easily with that so I will aim to produce 30 of the vertical at 480*1.3*20 and another 30 for the horizontal at 460*1.3*20
The 1.3 is to allow the strip to stand proud of the surrounds as I want to sand it in without worrying about it being to small anywhere. The 20 is 2mm higher than required as my current build plan involves 2 thickness stages where the individual strips get thicknessed down to 19mm and then when two blocks are joined together (and after star points are applied) then a final thickness down to the required 18mm will be made. More details when this occurs but the new principle is that I want to thickness the top and not try and scape of sand the top once done (which was what was done previously) and that resulted in some unevenness. Both the lengths are also over sized and this is to allow for the fact there is little control of the strip at either end when thicknessing (and the last bit will get pulled through the thicknesser as opposed to correctly pushed) which can cause more material to be cut away.
The 1.3 is to allow the strip to stand proud of the surrounds as I want to sand it in without worrying about it being to small anywhere. The 20 is 2mm higher than required as my current build plan involves 2 thickness stages where the individual strips get thicknessed down to 19mm and then when two blocks are joined together (and after star points are applied) then a final thickness down to the required 18mm will be made. More details when this occurs but the new principle is that I want to thickness the top and not try and scape of sand the top once done (which was what was done previously) and that resulted in some unevenness. Both the lengths are also over sized and this is to allow for the fact there is little control of the strip at either end when thicknessing (and the last bit will get pulled through the thicknesser as opposed to correctly pushed) which can cause more material to be cut away.
The extra strips (all 11 for each type) are there for issues where mistakes are made constructing and I have to replace as opposed to being quality spares...
Anyway that's it for now and I will probably post next when the strips are cut though that will just be a fairly simple progress post.

Comments
Post a Comment
What are your thoughts?