A Goban 19*19 - Part One
Now the prototype
is out of the way it is time to start on a full board with (hopefully useful)
process improvements. As before I will be describing in horrifically exhaustive
detail the entire process so that hopefully other wood workers can copy the design
and style to do their own (should they wish)
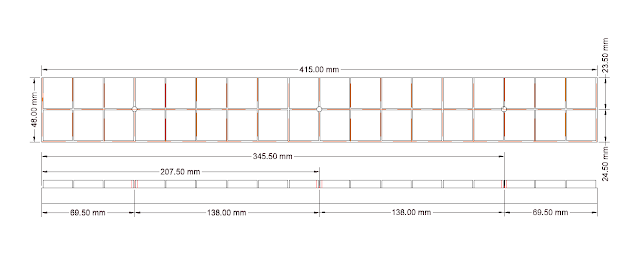
Plans
The plans were not
an issue last time so I just generated new ones for the larger board. Two
additional plans produced were a duel strip plan to help with the star point
drilling and a half size strip to allow the horizontal cuts to be made.

the plan designed to assist with star point placement
Cut List
For this project I
worked out a well resourced cut list.
There is a lot of spare wood because there are always things that go
wrong and I don't want to have to fiddle about with trying to make something
work when quantity will help oleviate many nasty issues.
I did spend some
time considering wood choice this time as the prototype choice was too dark
(well it wasn't at the start but it certainly ended that way). In the end I
went for unsteamed Beach with either the caulk approach or American Black
Walnut for the lines.
White Beech
9 boards of
18mm deep 140 wide
and 500 long
3 boards of
18mm deep 100 wide
and 600 long
Black Walnut
5mm deep 100 wide
420 long

The initial 'large' wood order
I have a lovely UK
source of nicely )accurately) planed wood which at woodshopdirect.co.uk which
allows me to do far less wood preparation and thus far faster wood work. It
comes beautifully packaged as well so I do recommend them especially if (like
me) you don't have the space for the larger tools required to prepare the
larger 2ft wide plans common at most wood mills.
As you will not this
is a lot of wood but my intention is to have 4-6 strips of the Piece I and
26-32 blanks of the Piece II. Piece I requires 1 and Piece 2 17 so it gives a
lot of reserves.
Cutting the Pieces
I started this time
cutting the strips. The length was not fixed at this point (for reasons covered
in the next section) and I cut about 0.5 mm over size in case of table saw
mistakes. One difference here was that I
marked the ends prior to cut so I knew which board it came from, which cut it
was, which way the board was facing and what the blank was for.

cutting the primary strips
Initial Sizing
Sizing started with
the depth. Since the wood was already at a decent 18mm due to the supplier I
did not need to do a lot so I just skimmed off 0.4 mm with my thicknesser. This
was done to remove any slight marks caused by the original planing and to ensure
everything was the same size. One
important note when thicknessing Is that you are likely to get extra bite at
the ends where the drum/blades first 'bite' and leave and you can also get
curves. This was not an issue with the 9x9 as the pieces were small enough that
the thicknesser base plate forced it to cut level. With a much longer strip the
wood can curve and not get corrected.
Either way may
method was to set a cut. Push through the piece, trying to keep the feed
steady. I then re-adjusted the cut to the same point and pushed it through
again. The reason for this is that all planers/thicknessers can loosen their
cut if the cut made is to large or the wood is touch (without this you would
get a lot more damaging 'locks' where the tool stops working. This means you
can sometimes get a larger cut/sand at the start of the piece than at the end.
Once the cut point is re-set you then get any discrepancy ironed out. Don't
flip the piece when doing this as otherwise the extra wood is taken of the
bottom which can cause weirdness in shape.
Having a longer
piece than required helps with this as the ends will get lopped off so any bite
back will be dealt with when sizing to length later.
I then thickenssed
the sides to the correct widths.
Grading
I now had a lot of
blanks so I decided to grade the pieces. For this you need a flat surface.
Fortunately for me I had an old (larger) table saw that is now broken but that
I use as a surface. This has a planed, flat, steel top that doesn't warp and is
a good base point. I placed each blank on the top and looked for gaps and shape
issues. Each piece then had a double grade indicating firstly flatness/accuracy
of the top and bottom and then another for the sides. I used four grades.
A - Lovely and Flat
B - slight
imperfections
C - larger
imperfections
D - Unuseable
imperfections
So a piece might be
A/A for perfect all over or B/D for slight imperfections on top/bottom but
unusable for the sides. This mark was
made on the bottom of the piece (which is important for the vertical slot cut)
and I aimed to ensure that any piece with imperfections had any convex curve on
top and not on the bottom. This is simply because a piece that is higher than
the surrounding wood just needs the sticking out section planing/sanding
whereas if you have a concave piece then everything else needs reducing to the
level of the single piece.

the strips estimated and marked on straightness and source
I was pleased with the result. The key indicator was the second (as the top can be planed post board generation)
My sorted list was
Piece I (1 required)
1 A/A
2 B/A
1 B/C
1 D/C
Piece II (17 required)
8 A/A
2 A/B
2 B/A
4 B/B
3 C/A
1 A/C
4 C/B
2 C/C
1 D/A
1 D/B
2 D/C
so I had mostly A-Bs and only a couple of C/As needed to round out the mix. This also provided me with a small group containing 'D's that I could use for test cuts and preparatory work.

checking the straight edges for flatness
Long Cut
This was a simple
enough matter of setting the fence to only engage 1mm of the blade at a depth
of around 5.6mm and running some test cuts to check depth and width. Once happy
I ran all the piece through (piece I's both sides) making certain I could 'see'
the A/B etc rating before cutting (as that was the bottom and we want the top
to be face down and being cut into)/

the table saw prepared for the edge cuts on distance and height

cutting the edge cuts
First Sizing
Now I had my
vertical cuts I could then play around with which piece might go next to which
piece and building up my ideal board. In practice I may lose one or two due to
bad cuts but if all goes well these will be the main basis for my 19x19. If
this goes well some of the remaining pieces can be shortened and form another
9x9.

edge cuts all done on the selected 'best' pieces
Horizontal Cuts
For these I came up
with a new approach. I printed off some half size strips which I then cut and
glooped (a rather nice gel that sticks but is relatively easy to remove) onto
one of the D pieces with a good side (so the D was for top/bottom).

using two of the less decent pieces for the cross cuts
I
then switched the saw blade from the wood cutting blade to a slitting blade.
This is less decent at ripping stuff but is very good at cutting small slots.
The larger the cut and the harder it makes the saw work so it is very much a
'horses for courses' type situation.

saw blade comparison. the default is on the left and the slitting blade is on the right.
I could then cut the
slots in my test piece and then measure to ensure no miscuts had made a length
mismatch between slots.
For the rest of the
pieces I carried out a free cut at one end on all pieces and then attached this
cut to the test piece with an appropriate plank. I could now 'set' the test
piece on the blade and then cut the actual repeatedly. The primary concern is if
the blade slowly loosens the test pieces cut widths instituting a marginally
increasing unsteady cut.
My first attempt at
a guide failed with one of the gaps to large at 23mm and the next to that to
small so after trying to work around it I decided the chance of a process error
was high and tried with a second guide piece. Here I ensured the strip was close
to the bottom so the set square line was a better indicator. This was much more
reasonable with all lines around 22mm. Note that though perfection would be
wonderful it is not required. What I am after is enough accuracy that the human
eye cannot look at the board and say - "hmm that column is wider than that
one". When you get down to discrepancies of 0.2mm or less then that is not
a problem. 1mm? Yes the human eye can pick that up.
Once I had a working
guide I cut into one of the spare pieces to check the process. Here I used a
thin plank to align then masking taped the top to secure the two pieces. Once
done I checked the gaps on the newly cut piece and then flipped to check them in
the opposite direction for any nasty visible mis-alignments and all seemed
well. After the second cut through the guide all the tearing at the edges has
now gone making using the guide much easier.

marking the accuracy of the cross cuts
The next step was to
repeat on two of the important pieces and then to check alignment with each
other. All good so far. By the time I
had cut four pieces I noticed that my guide was, very slightly, starting to
show bigger gaps for some of the lines. Therefore I switched to a new policy of
using my initial four as templates for two pieces each. The key is to ensure
that each piece has the initial cut and then two guide cuts - so when I run out
of pieces to guide then I will just re-cut to ensure the same depth etc. As a
slight advantage this will also clean out the vertical cuts quite nicely.

cross cuts done
Human error (and to some extent incremental blade errors) will creep in so I now had to re-check my piece order and (in some cases) replace preferred strips with some of the spares. I had to replace around three in the end but bar two to three slight visible line changes was happy with the result. If I was after perfection, and to be frank in woodwork perfection is a journey you never get to but want to progress towards, then I would consider increasing the cutting list and having an extra ten or so strips which would have avoided this issue.

trying to sort out the optimal piece arrangement
Once I had my optimal arrangement I then had to trim some of the ends to make sure they were of matching size prior to gluing - after this I have no sanders that can cope with the lengths involved.

gluing - with central support to try and increase flatness
Gluing was organised in several stages. The pieces requiring star holes were done first and only after those holes are drilled will the full board be glued together.

side shot of initial glue showing end markings of piece order markings
Next up will be the generation of the star pieces and their drilling followed by completing gluing, surrounding structure and oiling. Phew...


Comments
Post a Comment
What are your thoughts?